Sign In With Coinbase API Key Authentication
API Key authentication should only be used to access your own account. To securely access the accounts of other Coinbase users, use Sign in with Coinbase (OAuth2)
Sign in with Coinbase APIs can be accessed using API Keys created on the Coinbase Development Platform (CDP). See CDP API keys.
CDP API keys
Keys created on the Coinbase Development Platform (CDP) may not yet be supported by all third-party applications.
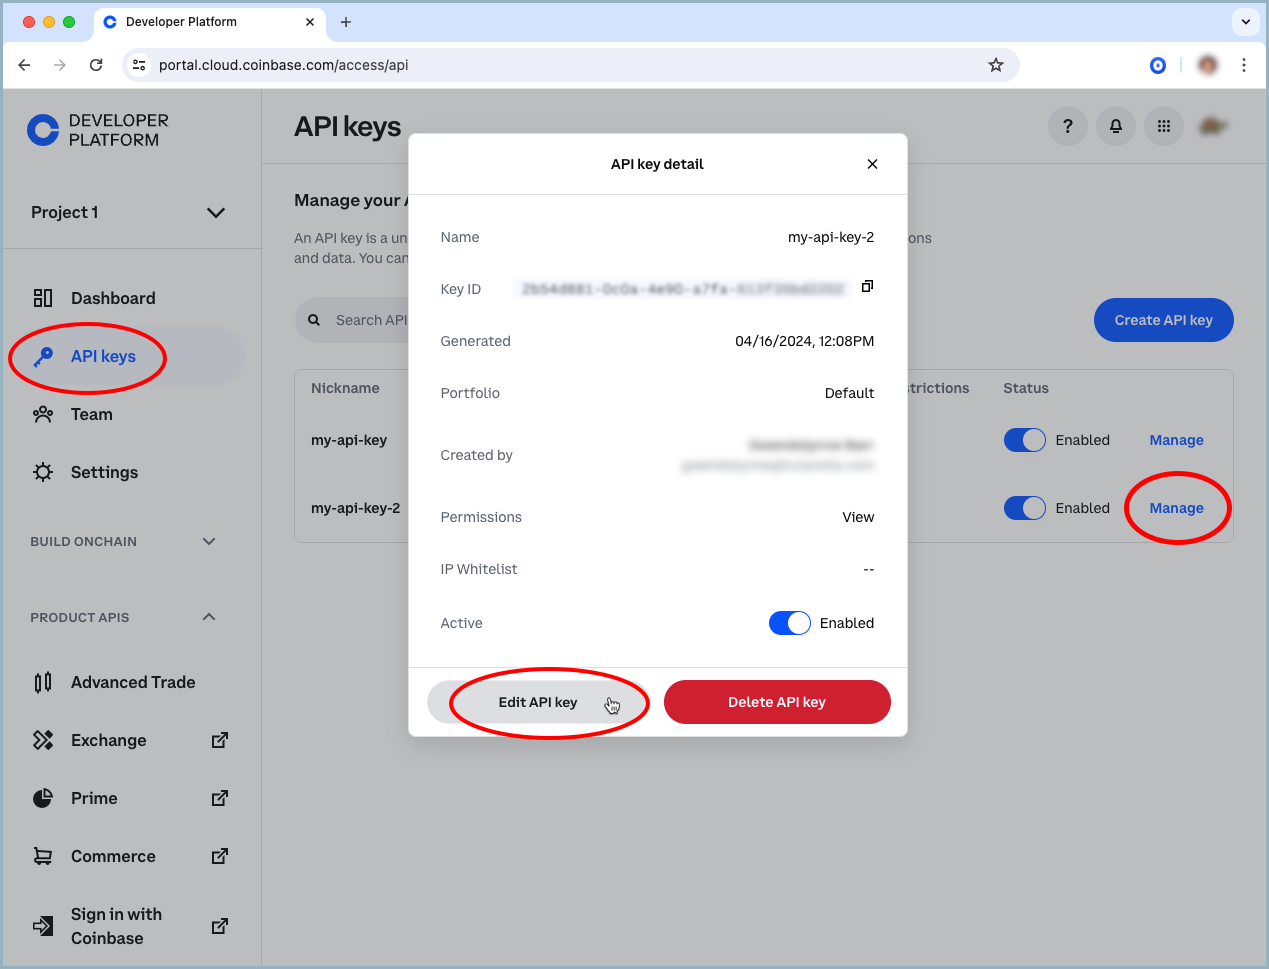
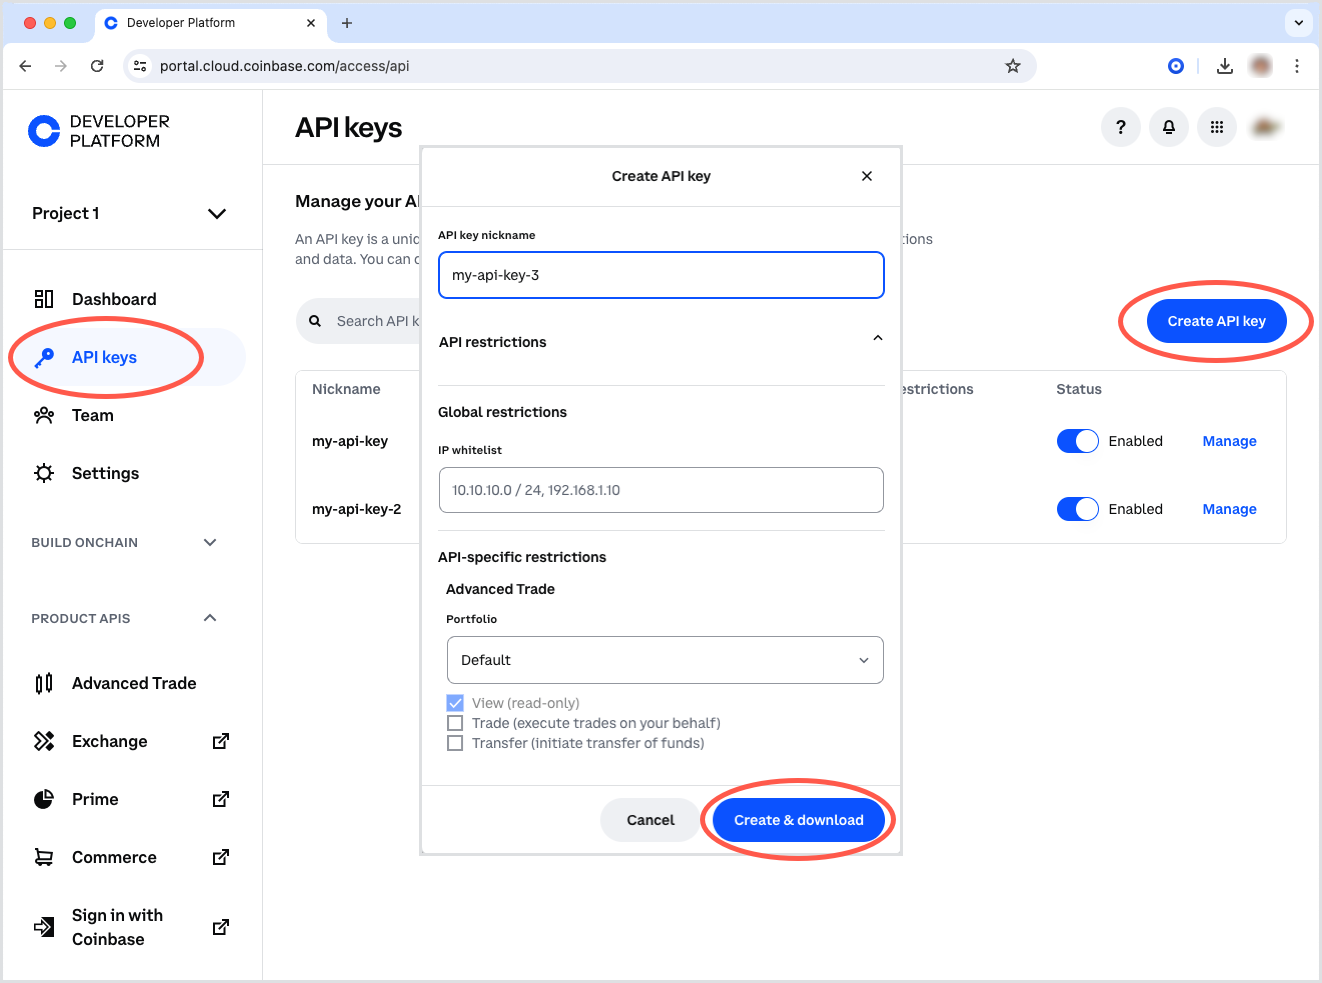
Creating API Keys
- Log into Coinbase Developer Platform (CDP).
- Navigate to Access → API keys.
- In the Create API key dialog, configure:
- API key nickname.
- Portfolio (e.g., Default).
- Permission level (View, Trade, Transfer).
- Allowlist IPs.
- Click Create & Download.
- Click Complete 2-factor authentication and enter your CDP 2FA code. The key automatically downloads as a JSON file.
- In the final popup, you can optionally copy the
API Key NameandPrivate Key(which are also in the JSON download). Read the warning and click Got it to finish.
Making Requests
CDP API keys are used to generate a JSON Web Token (JWT) for an API. Once you've generated a JWT, set it as a Authorization Bearer header to make an authenticated request.
# Example request to get account
curl -H "Authorization: Bearer $JWT" 'https://api.coinbase.com/v2/accounts/f603f97c-37d7-4e58-b264-c27e9e393dd9/addresses'
Generating a JWT
Regardless of which code snippet you use, follow these steps:
- Replace
key nameandkey secretwith your key name and private key.key secretis a multi-line key and newlines must be preserved to properly parse the key. Do this on one line with\nescaped newlines, or with a multi-line string. - Replace the request method and the path you want to test. If the URI has a UUID in the path you should include that UUID here, e.g.,
/v2/accounts/f603f97c-37d7-4e58-b264-c27e9e393dd9/addresses. - Run the generation script that prints the command
export JWT=.... - Run the generated command to save your JWT.
Your JWT expires after 2 minutes, after which all requests are unauthenticated.
You must generate a different JWT for each unique API request.
Code Samples
The easiest way to generate a JWT is to use the built-in functions in our Python SDK as described below.
Otherwise, use the code samples below to generate/export a JWT and make an authenticated request.
- Python SDK
- Python
- Go
- JavaScript
Install the SDK.
pip3 install coinbase-advanced-pyIn the console, run:
python main.py(or whatever your file name is).Set the JWT to that output, or export the JWT to the environment with
eval $(python main.py).Make your request, example
curl -H "Authorization: Bearer $JWT" 'https://api.coinbase.com/v2/accounts'
from coinbase import jwt_generator

api_key = "organizations/{org_id}/apiKeys/{key_id}"
api_secret = "-----BEGIN EC PRIVATE KEY-----\nYOUR PRIVATE KEY\n-----END EC PRIVATE KEY-----\n"

request_method = "GET"
request_path = "/v2/accounts"

def main():
    jwt_uri = jwt_generator.format_jwt_uri(request_method, request_path)
    jwt_token = jwt_generator.build_rest_jwt(jwt_uri, api_key, api_secret)
    print(f"export JWT={jwt_token}")

if __name__ == "__main__":
    main()
Install dependencies
PyJWTandcryptography.pip install PyJWT
pip install cryptographyIn the console, run:
python main.py(or whatever your file name is).Set the JWT to that output, or export the JWT to the environment with
eval $(python main.py).Make your request, example
curl -H "Authorization: Bearer $JWT" 'https://api.coinbase.com/api/v3/brokerage/accounts'
import jwt
from cryptography.hazmat.primitives import serialization
import time
import secrets

key_name       = "organizations/{org_id}/apiKeys/{key_id}"
key_secret     = "-----BEGIN EC PRIVATE KEY-----\nYOUR PRIVATE KEY\n-----END EC PRIVATE KEY-----\n"
request_method = "GET"
request_host   = "api.coinbase.com"
request_path   = "/v2/accounts"
def build_jwt(uri):
    private_key_bytes = key_secret.encode('utf-8')
    private_key = serialization.load_pem_private_key(private_key_bytes, password=None)
    jwt_payload = {
        'sub': key_name,
        'iss': "coinbase-cloud",
        'nbf': int(time.time()),
        'exp': int(time.time()) + 120,
        'uri': uri,
    }
    jwt_token = jwt.encode(
        jwt_payload,
        private_key,
        algorithm='ES256',
        headers={'kid': key_name, 'nonce': secrets.token_hex()},
    )
    return jwt_token
def main():
    uri = f"{request_method} {request_host}{request_path}"
    jwt_token = build_jwt(uri)
    print(f"export JWT={jwt_token}")
if __name__ == "__main__":
    main()
- Create a new directory and generate a Go file called
main.go. - Paste the Go snippet below into
main.go. - Run
go mod init jwt-generatorandgo mod tidyto generatego.modandgo.sumto manage your dependencies. - In the console, run
go run main.go. This outputs the command,export JWT=. - Set your JWT with the generated output, or export the JWT to the environment with
eval $(go run main.go). - Make your request, for example
curl -H "Authorization: Bearer $JWT" 'https://api.coinbase.com/api/v3/brokerage/accounts'
package main

import (
    "crypto/rand"
    "crypto/x509"
    "encoding/pem"
    "fmt"
    "math"
    "math/big"
    "time"

    log "github.com/sirupsen/logrus"
    "gopkg.in/square/go-jose.v2"
    "gopkg.in/square/go-jose.v2/jwt"
)

const (
    keyName       = "organizations/{org_id}/apiKeys/{key_id}"
    keySecret     = "-----BEGIN EC PRIVATE KEY-----\nYOUR PRIVATE KEY\n-----END EC PRIVATE KEY-----\n"
    requestMethod = "GET"
    requestHost   = "api.coinbase.com"
    requestPath   = "/v2/accounts"
)

type APIKeyClaims struct {
    *jwt.Claims
    URI string `json:"uri"`
}

func buildJWT(uri string) (string, error) {
    block, _ := pem.Decode([]byte(keySecret))
    if block == nil {
        return "", fmt.Errorf("jwt: Could not decode private key")
    }

    key, err := x509.ParseECPrivateKey(block.Bytes)
    if err != nil {
        return "", fmt.Errorf("jwt: %w", err)
    }

    sig, err := jose.NewSigner(
        jose.SigningKey{Algorithm: jose.ES256, Key: key},
        (&jose.SignerOptions{NonceSource: nonceSource{}}).WithType("JWT").WithHeader("kid", keyName),
    )
    if err != nil {
        return "", fmt.Errorf("jwt: %w", err)
    }

    cl := &APIKeyClaims{
        Claims: &jwt.Claims{
            Subject:   keyName,
            Issuer:    "coinbase-cloud",
            NotBefore: jwt.NewNumericDate(time.Now()),
            Expiry:    jwt.NewNumericDate(time.Now().Add(2 * time.Minute)),
        },
        URI: uri,
    }
    jwtString, err := jwt.Signed(sig).Claims(cl).CompactSerialize()
    if err != nil {
        return "", fmt.Errorf("jwt: %w", err)
    }
    return jwtString, nil
}

var max = big.NewInt(math.MaxInt64)

type nonceSource struct{}

func (n nonceSource) Nonce() (string, error) {
    r, err := rand.Int(rand.Reader, max)
    if err != nil {
        return "", err
    }
    return r.String(), nil
}

func main() {
    uri := fmt.Sprintf("%s %s%s", requestMethod, requestHost, requestPath)

    jwt, err := buildJWT(uri)

    if err != nil {
        log.Errorf("error building jwt: %v", err)
    }
    fmt.Println("export JWT=" + jwt)
}
Install JSON Web Token:
npm install jsonwebtokenIn the console, run:
node main.js(or whatever your file name is).Set the JWT to that output, or export the JWT to the environment with
eval $(node main.py).Make your request, example
curl -H "Authorization: Bearer $JWT" 'https://api.coinbase.com/api/v3/brokerage/accounts'
const { sign } = require('jsonwebtoken');
const crypto = require('crypto');

const key_name       = 'organizations/{org_id}/apiKeys/{key_id}';
const key_secret = '-----BEGIN EC PRIVATE KEY-----\nYOUR PRIVATE KEY\n-----END EC PRIVATE KEY-----\n';
const request_method = 'GET';
const url = 'api.coinbase.com';
const request_path = '/v2/accounts';

const algorithm = 'ES256';
const uri = request_method + ' ' + url + request_path;

const token = sign(
        {
            iss: 'coinbase-cloud',
            nbf: Math.floor(Date.now() / 1000),
            exp: Math.floor(Date.now() / 1000) + 120,
            sub: key_name,
            uri,
        },
        key_secret,
        {
            algorithm,
            header: {
                kid: key_name,
                nonce: crypto.randomBytes(16).toString('hex'),
            },
        }
);
console.log('export JWT=' + token);
Security Best Practices
Storing Credentials Securely
Store your credentials securely. If someone obtains your api_secret with the transfer permission, they will be able to send all the digital currency out of your account.
Avoid storing API keys in your code base (which gets added to version control). The recommended best practice is to store them in environment variables. Learn more about environment variables here. Separating credentials from your code base and database is always good practice.
API Key access is turned off by default on all accounts. To implement an API Key integration, you therefore must first enable it,and then take necessary precautions to store the API Key securely. You can always regenerate your API Key (or disable it) if you feel it has been compromised.
Validating SSL Certificates
It is also very important that your application validates our SSL certificate when it connects over https. This helps prevent a man in the middle attack. If you are using a client library, this may be turned on by default, but you should confirm this. Whenever you see 'verify SSL' you should always ensure it is set to true.
Additional Security for API Keys
For enhanced API Key security, we recommend that you whitelist IP addresses that are permitted to make requests with a particular API Key.
You can specify IP addresses to whitelist when creating a new API Key or editing an existing one.